Introduction
Hi there! This resource was created specifically for QMUL MSc Game AI Project students. If you do not fit in that category, then a lot of these resources will probably be inaccessible or not very useful to you. However, maybe you do find something interesting!
For QMUL MSc Game AI Project students: this page wishes to offer a helping hand in getting started with your MSc project. It aims to introduce several concepts that are usually assumed you already know. And you might already know all of this, in which case, awesome! The hope is that you find something useful here to take away and use in your project, even if this is just some inspiration.
The page is structured in several tabs:
- Writing guide, specifically aimed at research papers / project reports, but including:
- Critical Literature Review
- Other writing tools
- Some basic information for getting started with…
- Java, with particular applications in Game AI
- Github and version control
- IntelliJ / PyCharm (IDEs for Java/Python)
- Latex/Overleaf for report writing
- Support page with links to various useful resources - please check it out!
Links
An assortment of other useful links:
- QMUL Game AI group website
- QMUL Game AI group calendar (we can also add you to the mailing list if you'd like to take part in our weekly meetings and seminars, contact your supervisor in this case)
- QMUL How to research
- QMUL Guidance for writing lab reports
- QMUL academic skills resources
- QMUL Harvard referencing
- How to be a successful PhD student
- The Missing Semester of Your CS Education (Shell Tools and Scripting, Editors (Vim), Data Wrangling, Command-line Environment, Version Control (Git), Debugging and Profiling, Metaprogramming, Security and Cryptography etc.)
- Things a scientist is supposed to know
- "Twenty things I wish I’d known when I started my PhD"
- State-of-the-art script
- Fuse
- Many tools for writing or others
Main
Common Feedback & General Tips
This document compiles some common feedback on reports and some general writing tips, to help you write better assignments/project reports. This is only a brief summary of some main points, if you want to read more on this, check out this guide for technical writing by Norman Fenton.
General Report Presentation
- Templates: Make use of the templates given (i.e. don’t alter fonts, sizes, spacing etc.).
- Structure: Structure your report into sections (and sub-sections!), and the sections into paragraphs. A nicely structured report can more easily convey the quality of its contents. However, don’t overdo it either - having only 1 short sentence in a sub-section, for example, is a sign that you’ve added too much structure.
- Language: This is a formal report, avoid colloquial or casual language.
- Padding: Quality over quantity! Avoid unnecessary repetition or padding of any sort (e.g. extra text, repetitive text, stating the obvious, long pieces of code, repetitive images etc.).
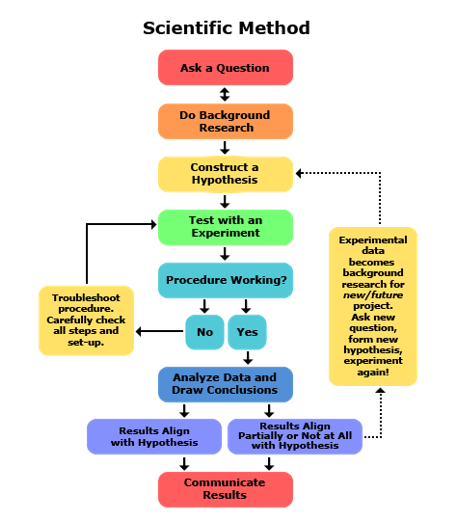
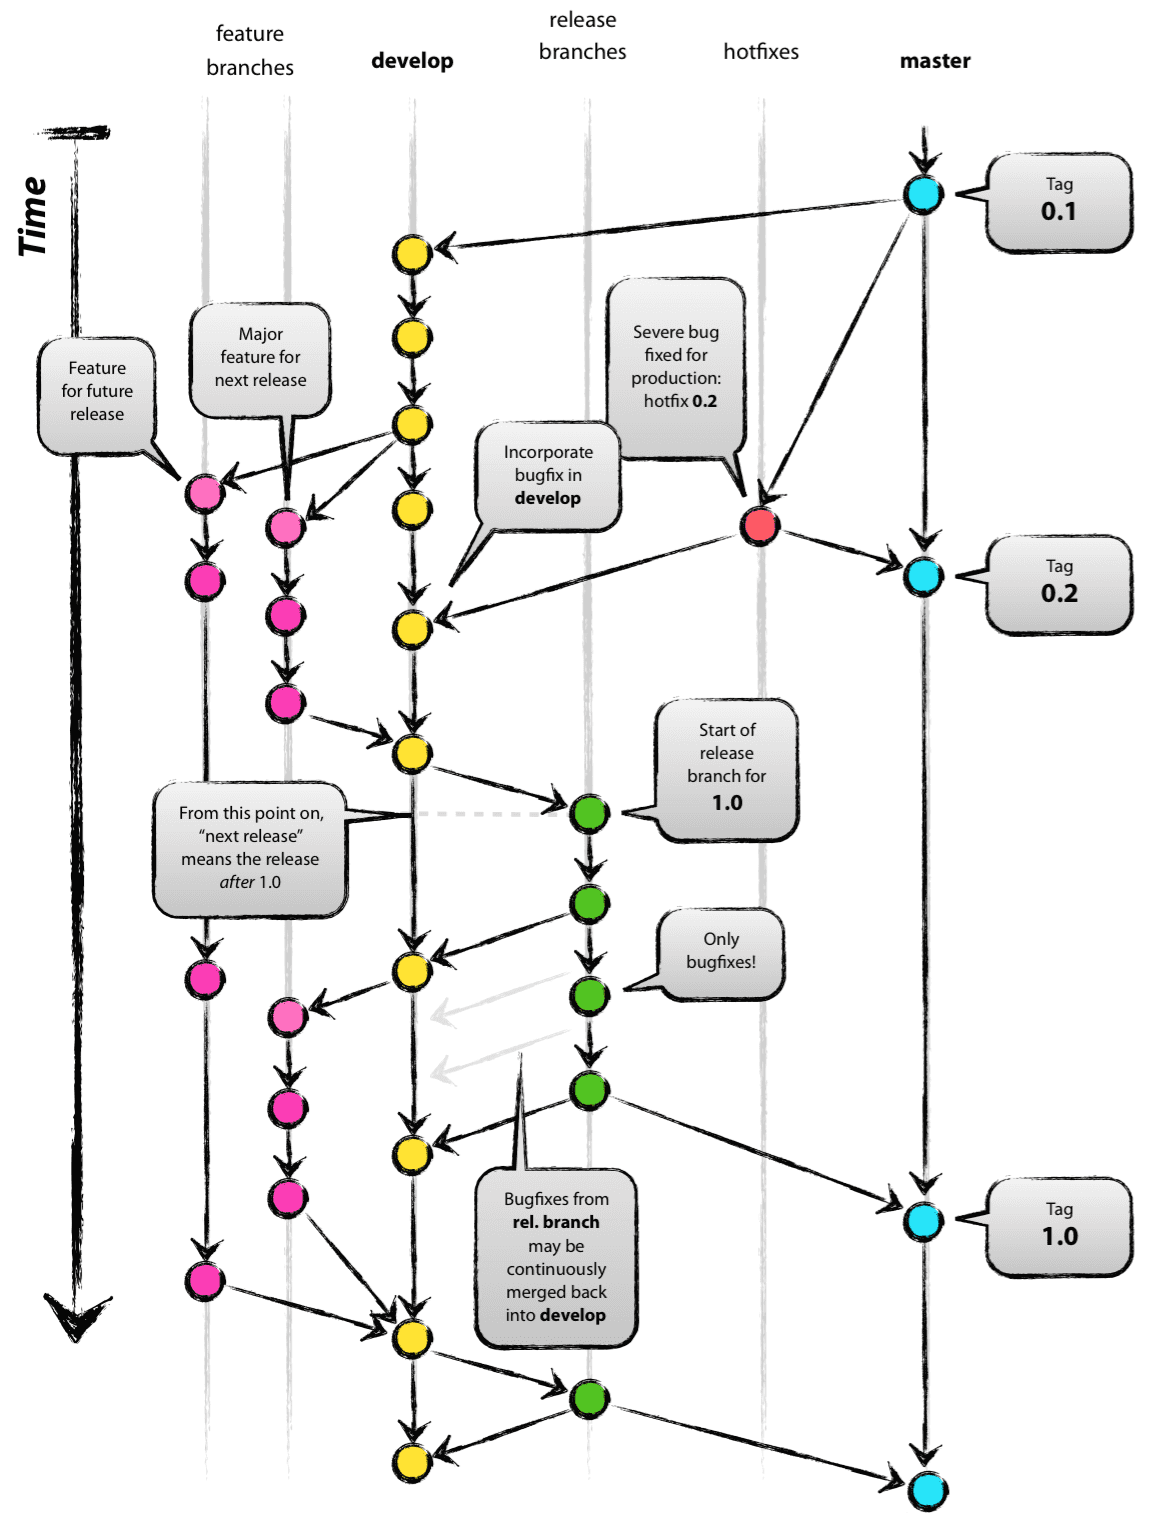
- Workflow: See Figure 1 for a diagram depicting workflow for research, which a report should reflect too.
- Precision: Be precise, specific in your language. For example, ”The modifications made the agent better” versus ”The modifications described in Section 5.2 increased the MCTS agent’s average win rate on all game settings tested (see Section 6.1) by 10%” (hint: the second is better in a technical report).
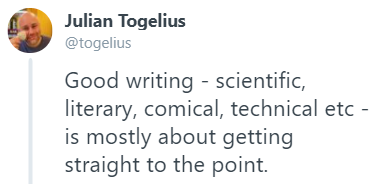
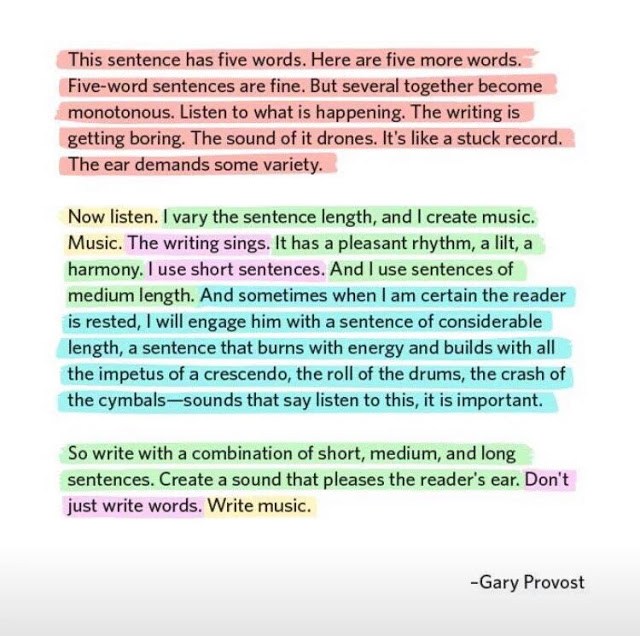
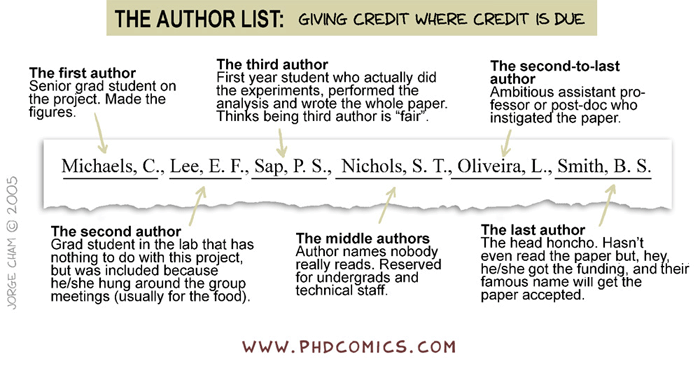
- Reader: When writing a report, think of the reader. Write good text, watch out for grammatical errors and typos. If you can keep them entertained, they’ll read until the end. In other words, don’t be boring (see Figure 2). Don’t write disjoint paragraphs, build a narrative.
- Writing: Start by noting down all ideas you have (bullet points are a great option at this point). Keeping notes as you do the research (development, experiments) is useful to be able to include small details or decisions you make that you may forget about by the end, when you have to do the formal write-up of the process.
Figures, tables, code
- Captioning: Any figures (images), tables and code snippets you include should be correctly labelled, captioned and referred to in text. For example, a plot of an AI agent’s win rate could have the caption: Figure 3. Average win rate of the A* agent over 10 runs. Then, in your text you could mention: The win rate of an A* agent was tested in several levels (see Figure 3) and we can observe that [...]. If you don’t refer to them in text, the reader can assume they’re not necessary for the understanding of the report and won’t look at them.
- Code snippets: If you copy-paste your code from your agent to explain what it does, label it as “code snippet” and not pseudo-code. If you write pseudo-code instead, label it as such.
- Margins: Make sure all your figures, tables, code and other materials fit within the margins of the document (nothing should float outside of where the text blocks begin/end).
References
- Peer-review: Cite predominantly peer-reviewed papers, articles or books. Include external links or materials in footnotes if needed, references should not be just a link to an external website.
- Critical review: Review literature critically, mention how it relates to your work, identify gaps or issues with previous approaches etc.
- Relevance: Cite work that is relevant to the framework and methods you use. Make sure the references actually make sense. Don’t add references just for the sake of increasing the number of cited works. However, reviewing several different works that use similar methods to what you use and/or similar environments is preferable.
- Referencing style: Make sure you consistently adhere to one (and only one) referencing style: IEEE, Chicago, Harvard, Vancouver, etc. These styles indicate the fields that should be included in a reference and their order, for each type of reference you cite (book, paper, article, etc.). For example, if you follow IEEE referencing style, check out their IEEE Reference Guide.
- Claims: Make sure to back up any claims you make with either evidence or references.
- Placing: Any references should be placed within sentences [1]. Don’t include the citation in section headers, but in the text. If you talk about one piece of work in a paragraph, in most cases, only one reference either in the beginning or the end is needed (i.e. don’t add the same reference after each sentence in a paragraph).
- Finding literature: If you don’t know where to start looking for references, look up some key words in Google Scholar and read through paper abstracts to identify those possibly relevant to your topic. If that doesn’t give you enough material, a common technique used in reviewing work is checking references on the relevant papers you’ve already found (i.e. those suggested to read in a module lecture notes / lab scripts), and find those papers cited which might be relevant (not all would be, depending on the angle of the work). Tracing through references could result in quite a large collection of literature, make sure to narrow it down to your selected topic. Another resource for this is arXiv, often containing state-of-the-art research, but use these articles sparingly as they are not peer-reviewed.
Content
- Why: Why are you doing this research? Just because it is an assignment is not an option (and doesn’t need to be mentioned in your report either). Motivate your work and fit it within the larger research area (introduction, literature review, background). Make the reader understand why what you write is important, especially for the literature review. Let the reader understand where your work fits in the related works and how it fills possible gaps in the literature.
- What: Given your literature review and background information, what are you going to research? Describe the techniques involved in your research (background) and what’s your specific contribution, your approach to answer the research question (methods).
- How: Describe how you are going to apply and test your approach (experimental setup), with sufficient details so that it can be repeated and replicated by external researchers.
- What happened: Present results, plots, tables, output data.
- What does it mean? Analyze the results, discuss why you may have gotten these specific results, and how does this relate to your initial motivation, does it answer your question? It’s okay if it doesn’t, and it’s okay to make speculations as to why something may have happened (further investigation into this ‘why’ can be mentioned as future work).
- Recap: Always conclude a report with a brief summary of what the document describes (the what, the how, and the results discussions), and add notes for further studies that can be done based on the results obtained.

Finding papers to read and cite
The easiest way to get started is to head to Google Scholar and search for keywords related to your project:
- Save and make notes of all papers you find that seem relevant based on their title and abstract.
- Read the introduction and conclusions of this first list of papers, and eliminate those that are not actually relevant for you.
- Look at the list of references in the papers collected and retrieve any other papers that seem relevant to your topic. Repeat the steps above for this new list of papers, and keep going until you have at least 20 papers that have some connection to your project.
- Follow the steps below to read each paper in more detail, and make notes on each one.
Some other ways to find papers:
- Search on Google for your topic, using the keyword "survey". Surveys are longer papers that act as stand-alone literature reviews on particular topics, and therefore act as a great source for your own literature reviews. Look through the works cited in the survey to find relevant papers.
- Look for conferences where work related to your topic is usually published, e.g. IEEE CoG and search for proceedings for that conference. ACM and IEEE conference proceedings are easily accessible, but if you find a paper that is behind a paywall, try to search for its title in Google Scholar, or for its title and the "PDF" keyword in Google directly. Often, papers are published on the authors' websites or university archives and publicly available.
- IEEE Xplore (sign in with your QMUL login) / IEEE TOG, Arxiv, DBLP, ACM
Critical Review
You may come across the term critical when asked to do a literature review, or when receiving comments or feedback on your literature review. This refers to assessing the contribution of the work read and its connection to your own work, instead of simply summarizing the approach in the cited paper.
For example:
- Summary of work:
For example, approaches based on Hyper-Heuristics have been used in the General Video Game AI framework (GVGAI [2]) by Mendes et al. [11]. These approaches train the agent off-line to recognise the best strategy for the game at hand from a portfolio. When the agent has to play a new game, it uses the trained mechanism to select the best strategy depending on some of the game’s features. Experiments have shown that these approaches are promising and are able to outperform agents based on standard algorithms.- From: Raluca D. Gaina, Chiara F. Sironi, Mark H.M. Winands, Diego Perez-Liebana, Simon M. Lucas, "Self-Adaptive Rolling Horizon Evolutionary Algorithms for General Video Game Playing", in IEEE Conference on Games (CoG), 2020.
- Critical review:
Some games adopt this concept and research on social, interactive characters in order to create more immersive experiences for their players. A great example here is Emily Short’s game “Galatea” [9], which focuses on interactive storytelling. Emily Short writes about NPC conversation systems [10], showcasing different functionalities these can take. We are interested in the tutorial system most, although in our case it would be reversed: the humans would be giving the AI hints, and not the other way around, as in Matt Wigdahl’s “Aotearoa” [11] or Santiago Ontanon’s “SHRDLU” [12]. These characters, although becoming more and more impressive with the inclusion of memory, personality and adaptation to different players and play styles, they do exist only within the game. Our vision wishes to take this concept further and bring more presence into the real world to such characters.- From: Raluca D. Gaina, Simon M. Lucas, Diego Perez-Liebana, "Project Thyia: A Forever Gameplayer", in IEEE Conference on Games (COG), pp. 1-8, 2019.
What does a critical review include?
- The main ideas or arguments in the book or article. Don’t feel you have to mention everything: part of being an effective evaluator is being able to extract the most important ideas from a source.
- Your own evaluation of the article. Don’t just accept the author’s statements without question. Ask yourself questions such as: How effective is the author’s argument? Is it clearly presented and explained? Is it biased in any way?
- The connection to your work and/or to other works included in the same section. (Although this connection can sometimes be simply implied instead of explicitly stated.)
- A critical review is not just a summary!
Reading an article for a critical review
- Have a clear context in mind that you will place the work within, so that you can look for specifics related to your topic.
- Read the title and abstract first, to form an idea of what the article will cover.
- Take notes as you read of anything that is confusing or unclear. You’ll have two main purposes in your reading:
- Understand the author’s argument (what the author is trying to show, and the steps he or she takes to prove this argument).
- Evaluate the effectiveness of the author’s argument.
- Write down any questions you have (pay particular attention to questions that seem important, but that the author does not address).
Paper reviews
A good way to practice critically reviewing other works, instead of simply reading them to find out their methods/results, is to review papers. All articles published in journals or conferences undergo a review process, where several other scholars in the field read the paper and send back comments and feedback on the paper's presentation of the work, as well as the soundness of the work itself. This process is used to validate papers before they are published, making peer-reviewed articles more likely to contain accurate citable information than blog posts, arxiv.org articles etc.
Recommendation: when doing background reading for your project, record not only a summary, but also your own review of the paper (using the template provided or any other you prefer). This will help you in several ways:
- Reading the paper in more detail and questioning its soundness
- Understanding paper presentation techniques to use when writing up your own work
- Writing a critical literature review for your own work
The template provided at the end is a typical journal review template, which usually go in much more depth than conference paper reviews. The "relevance to project" topic was added specific to your usage of this template (and not an aspect covered in regular reviews).
Literature Reviews
A literature review is a type of critical review in which you analyse and evaluate many sources on a specific topic. The purpose is to provide your reader with an overview of the research that has been done on your topic, and to evaluate the sources you are reviewing. Focus on the most important points relevant to your topic.
For each paper, summarise the work and evaluate the effectiveness of the authors’ arguments and state the relevance to your own work. Point out areas where much research has been done, as well as areas where more research still needs to be done. It is also important to compare sources with each other, pointing out where they agree or disagree with one another.
Finally, draw conclusions from your findings, describing what the literature as a whole suggests about your topic. Take into consideration your evaluations of the relative effectiveness of the different authors’ arguments. If there are important aspects of the topic that have not yet been fully researched, you might not be able to reach definite conclusions. If this is the case, you can discuss why more research is needed.
Further reading
- Critical reviews and literature reviews, UMKC Writing Studio
- The critical literature review, Harvard
- How to write a literature review, HJIT
Critical paper review template
- Summary: briefly state what the paper is really about (may be different to what they say it is in the abstract/introduction).
- Contributions: what are the claimed contributions of the paper? How significant/important are the claimed contributions? What are the actual contributions (if different)?
- Support: how are these contributions supported? Is the support adequate? Correct? Is the evaluation adequate? Well-designed? Comment on the support for each claimed contribution and, if appropriate, on how the support could be improved.
- Relevance to project: how is this article relevant to your project? Are you going to use some of the methods described, compare to results obtained? Did you find a flaw in the approach or experimental setup which you will address in your work? Is there something mentioned in the future work section which you can use to build upon? Do their discussion of results or particular statements inform your thinking/work?
- Technical quality: is the paper technically sound? Does it adequately address the limitations of the results? Comment on how technical quality could be improved. Are the strengths/weaknesses and reasons for observed results explored systematically? Are algorithms, evaluation methodology, etc. described in sufficient detail? Could a reader replicate the work? Are the figures/tables sufficient?
- Originality: are the claimed contributions novel? Does the paper place the work appropriately in the context of related research?
- Clarity: comment on the writing, organization & exposition.
- Detailed comments of major issues: if specific issues highlighted need to be explained in more detail, do so. Could refer to specific sections or sentences.
- Minor changes: some changes (i.e. incorrect spelling or figure numbers) that would be easy to fix/don’t have a major impact in the overall quality of the paper.
- Academic Toolkit have some free resources available to help break down and design research or articles (in your case, the report): e.g. Article design canvas (browse the other tools and search for the "download" buttons). This will help not only to get started with asking the right questions and finding the right content, but also to frame your thinking when doing research.
- Voice dictation: software such as MS Word (available for free with your QMUL account) or Google Docs feature dictation tools which allow you to speak your writing. This can speed up the process of getting ideas down on paper, which can be fixed up later.
- How to write the introduction to a research paper
- Methods section clarity: write enough details so that anyone who doesn't closely know your work can understand it.
- How to write a great research paper:
- Don’t wait: write
Don’t follow the typical research of process of idea > research > paper. Instead, do idea > paper > research. Let the process of writing the paper guide your research. Writing your ideas down crystallises them, forcing you to think more deeply about your idea, and revealing possibilities you did not consider. It also creates a shareable artifact that you can use to invite collaboration and critique. - Identify your key idea
Imagine your paper to be virus whose goal it is to infect the mind of your reader with one key idea. This idea should be something useful and re-usable that stays with the reader after they’ve finished reading your paper. - Tell a story
Imagine explaining your research to a friend at a whiteboard. You would probably explain the problem first, describe why it is interesting and unsolved, talk about your idea and how it works (with details and data), then compare it with other approaches. Remember that you start losing readers from the first page onwards, so keep your paper engaging. - Nail your contributions
Ensure you focus on your contributions in the 1st page - list them in bullet points and make them refutable. Use forward references to link to where you justify the contributions later in the paper. - Related work: later
Related work can act as a barrier between your idea and the reader’s mind. It is better to include it at the end after you’ve already explained your idea simply. Use them earlier if they help explain your solution path better (e.g. if you’re building off of prior work), but don’t list them for the sake of adding alternative approaches or examples. Give credit freely (it is not a zero-sum game). - Put your readers first (examples)
Your problem is a labyrinth; in your research, you’ve encountered many dead-ends before hitting on the solution. You need to lead your readers comfortably to the solution. Address obvious objections your reader might have. Eschew technical-sounding prose since they will make your reader feel sleepy or stupid. A reader should be able to take something away from your paper even if they skip the details. - Listen to your readers
Get your paper read by as many friendly guinea pigs as possible. Explain carefully what you want (confusion is better feedback than spelling errors). Value the first time readers and make it easy for them to give you feedback. Reviews are gold dust; people are donating their time to write a review for you. Take criticism positively. - Twitter thread on writing abstracts: here.
- (Video) Creating and publishing a scientific masterpiece YouTube.
- (Course) Writing in the Sciences Coursera.
- Don’t wait: write
Why?
Version control is very important for any project you'll undertake. Keeping a history of your project developing not only allows you to see the progress you make and quantify it, but you can also use past milestones to your advantage. Has a new feature you just added broken the system? Revert back. Did you find a bug that you're not sure when it was introduced? Check the history. Do you have multiple options for implementing a feature? Do both in parallel "timelines" of the project and keep the one that works better.
There are many benefits to this concept that you'll slowly discover if you've not worked with version control before!
Github
Git and Github are an easy way to manage your project. Changes to different files can be grouped in named commits with a description, which are able to show the differences in the files changed for easy sanity checks. You can push these commits to update the code on the host server, and pull to update your local clone of the repository containing your project. You can develop multiple branches of your project in parallel, so you can test out different features without affecting any stable code you've already developed (and you can later merge these different branches into the master or main branch).
Github additionally includes further project management tools: you can create one or several projects associated with a repository, to keep track of tasks to-do / in-progress / done; you can add a wiki which documents the project across several easily navigable markdown pages. And you can create pull requests to manage the merging of branches, as well as issues for tasks that need to be done, bugs that need to be addressed etc.
Github accounts are free (with limited privileges), or you can request a Github Enterprise account to be created for you with your QMUL account.
If you're unfamiliar with git and command line (or simply prefer a nicer interface), check out Github Desktop.
Recommended Workflow
- Create a fork if you are working with an existing repository that you are not a collaborator in. This will create a copy of the repository which you own and can use the full tools with. If you are a collaborator in the project, simply clone the repository instead. Use the Github website to make a new repository if you need a new workspace (adding a README file which you can update later with instructions on using your code, and a template .gitignore file depending on your programming language or use case, which specifies which local files will be ignored and not included in the repository on Github), and clone that.
- Create a project in your repository. Add all of your tasks as issues, and these issues to the project.
- Make a new branch for each new feature you are planning to add.
- Create a pull request and link it to an existing issue (if relevant). Add documentation, tasks, goals for the feature you're planning to add.
- Push commits to your branches often - maybe not for every line changed in a file, but if you implement and test a concept that builds up to your feature, push it. It's easier to track things when everything is broken down into small chunks.
- Pull before you start working, to make sure you have the latest changes: especially important if multiple people are working in the same branch. You want to avoid merge conflicts as much as possible.
- Update your branch from the master every so often if there are new changes there.
- Update the pull request with documentation where big changes are achieved / needed.
- When your feature is ready, if you are working in a shared repository, ask others for a review of your code before merging.
- Merge your branch, update the project (if not automatic). Repeat for the rest of the features!
Further Reading
Basic step-by step instructions:
- Make an Overleaf account.
- Open the dissertation template .zip file as a project.
- Add a new .bib file to the project (any name would do, e.g. references.bib).
- Edit the .tex file to remove extra information and add your project title and author name.
- Add the following at the end of the file, just before the \end{document} command (to include the citing information in the references.bib file):
\bibliographystyle{IEEEtran}
\bibliography{IEEEabrv,references} - Share the Overleaf project with your supervisor.
- Add the rest of the contents in your paper.
1. Make an Overleaf account
Head over to https://www.overleaf.com/ and register! Basic accounts are free (and you should go for this option).
What is Latex?
LaTeX (pronounced LAY-tek or LAH-tek) is a tool used to create professional-looking documents. It is based on the WYSIWYM (what you see is what you mean) idea, meaning you only have focus on the contents of your document and the computer will take care of the formatting. Instead of spacing out text on a page to control formatting, as with Microsoft Word or LibreOffice Writer, users can enter plain text and let LaTeX take care of the rest.
What is Overleaf?
Overleaf is an on-line LaTeX edition tool that allows you to create and compile LaTeX documents directly in your web browser and share them easily with collaborators.
Basic Overleaf project
- .tex → Source file with Latex code. One file will be the main one being compiled for the project.
- .bib → Bibliography file, contains bibtex of one or several works to be cited in the paper.
- .cls → Style file, defines how the paper is formatted (think of CSS = cls vs HTML = tex if you're familiar with web development)
- .png / .pdf / others → Image files to be displayed in the project
- folders → Useful for grouping the different types of files together
2. Open the dissertation template .zip file as a project
Navigate to your home-page once logged in, click New Project → Upload Project and select the .zip file downloaded from QMPlus.
After opening the file, you should have a view similar to this:

Figure 1: Main project view
You can compile this project by clicking the green "Recompile" button, and you should do so after you make changes to the document in order to see these changes reflected in the PDF displayed. There may be errors in compilation, which can be reviewed by clicking the log button next to the compile button.
3. Add a new .bib file to the project
In Figure 1 above, the F letter highlights 3 buttons (from left to right): create a new file, create a new folder, or upload a file. Select the first button, input the name as "references.bib" and create it:
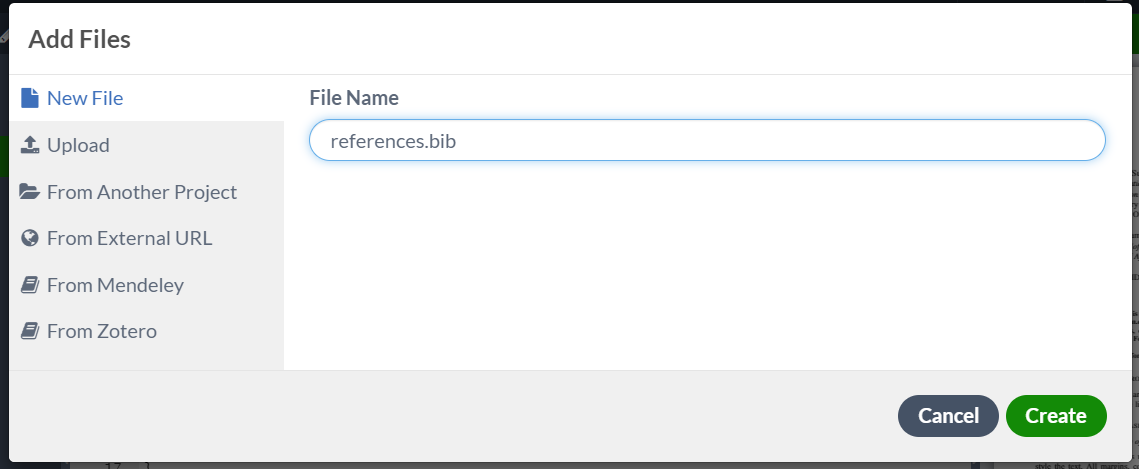
Figure 2: Creating a file
You can then add BibTeX information from your papers in this new file. To obtain these you can use Google Scholar, clicking the "cite" symbol underneath a paper, and then selectin the BibTeX option:
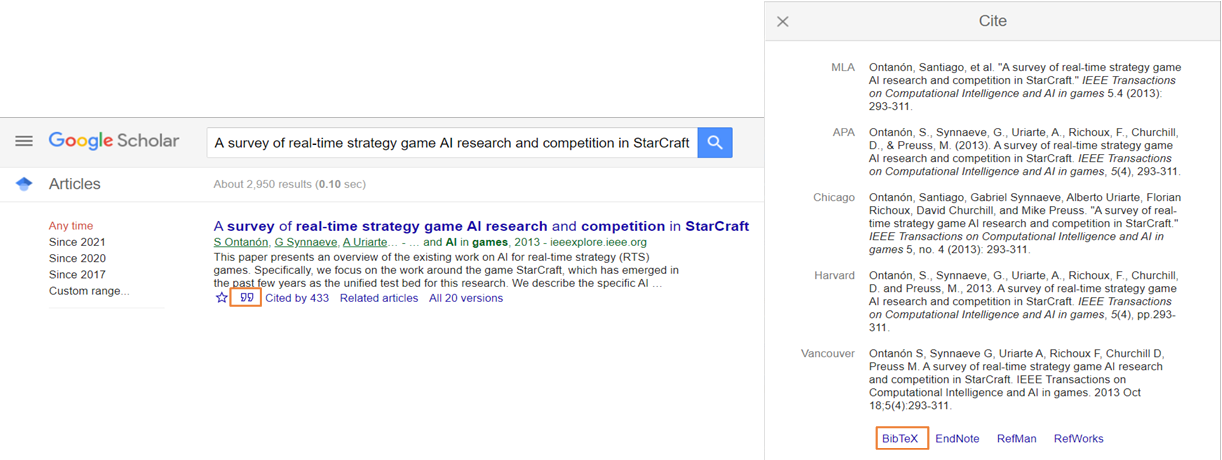
Figure 3: Obtaining citing BibTex information from Google Scholar
This will open a new browser tab with the code you need to copy into your .bib file, for example:
	@article{ontanon2013survey,
	  title={A survey of real-time strategy game AI research and competition in StarCraft},
	  author={Ontan{\'o}n, Santiago and Synnaeve, Gabriel and Uriarte, Alberto and Richoux, Florian and Churchill, David and Preuss, Mike},
	  journal={IEEE Transactions on Computational Intelligence and AI in games},
	  volume={5},
	  number={4},
	  pages={293--311},
	  year={2013},
	  publisher={IEEE}
	}
Which can be cited in your paper using the \cite{ontanon2013survey} command.
4. Edit the .tex file to remove extra information and add your project title and author name
In your project files, find the main .tex file (named conference_101719.tex by default) and find the \title{} (A in Fig.1) and \author{} (B in Fig.1) commands. In the author command, several author blocks (C in Fig.1) can be specified, separated by the \and command.
Command \maketitle (D in Fig.1) makes sure all this information is displayed in the PDF of your paper.
6. Share the Overleaf project with your supervisor
Find the "Share" button (E in Fig.1) and either input the email address, or create a shareable link and email this yourself instead. Give editing writes for e.g. help with debugging LaTeX.
7. Add the rest of the contents in your paper
When you are ready to do so, add the rest of the contents. Some basic commands that will be helpful in structuring this:
- The abstract will go between the brackets of the \abstract command.
- \section{Section name} makes a section. Similarly, you can have subsections, or subsubsections, or paragraphs.
- \label{Label name} gives a label to a structure (e.g. to a section). You can then refer to this structure with the \ref{Label name} command, which will automatically retrieve the correct numbering even if you rearrange things.
- \caption{Caption} adds a caption to a figure, table etc.
- \begin{itemize} makes a bullet-point list, where each bullet point starts on a new line with command \item. The bullet-point list must be closed with command \end{itemize}. Similarly, you can have a numbered list (enumerate).
- \begin{equation} Eq… \end{equation} makes an equation. You can add math in-line between $ symbols.
- Underscore (_) in a math block means subscript in latex, and ^ means superscript.
- You can force a new line with the \\ symbols.
- You can import extra packages with needed functionality by using the \usepackage command in the Preamble of the document (anything before the \begin{document} command).
- You can include code from other .tex files in your project with the \input command.
Further Reading
Learn LaTeX in 30 minutesA short course on Java for beginners, with a focus on its use for Game AI (though without explaining the corresponding AI concepts), assuming little to no previous programming experience, available for download (zip file): download
The lessons walk you through programming a simple game in Java and writing AI that plays the game. Some of the examples and explanations reference the game Pommerman as implemented here.
Code solutions for most exercises can be found in a Github repository. Check the commit history for the intermediary state of the code, e.g. this is the code updated with the solution to Exercise 3.
Zip contents:
- 1.pdf: first lesson slides, basic Java (types, variables) and Object-Oriented Programming concepts.
- 2.pdf: second lesson slides:
- Methods
- Classes, Inheritance and Interfaces
- Java Coding
- 3.pdf: third lesson slides:
- Arrays, lists, queues and sets
- Maps, Hash vs Tree
- Trees and Graphs
- Visualisation and Testing
- Exercise 1-14: exercises to follow in order, which appear in the slides but are also provided separately for easier reference. Some of these exercises reference other files in the zip files:
- mazeGraph.txt: used in Exercise 12
- mazeGraphDraw folder: explained in Exercise 12
- graphToGridDraw folder: explained in Exercise 13
- Week 2 - OOP: used in Exercise 1, with an example answer provided in Week 2 - OOP - myExample
- MazeGameOOP-StepByStepProcess.pdf: an alternative way of thinking about Object-Oriented problems.
Official guides
Download
As a student, you can sign up for a student pack to get access to the Ultimate versions and other JetBrains software, here.Why?
IntelliJ/PyCharm are very similar IDEs (integrated development environment) for Java and Python, respectively. They are currently the best options for either language (and both compatible with other languages as well), with all features you'll usually need available for free with the Community edition:- Source code editing
- Build automation
- Debugging
- Java/Python compiler
- Highlights syntax for clarity
- Highlights syntax errors while writing code
- Makes useful suggestions for completing in-progress code
- Easy navigation through code
Interface
An overview of IntelliJ (PyCharm works in a very similar way):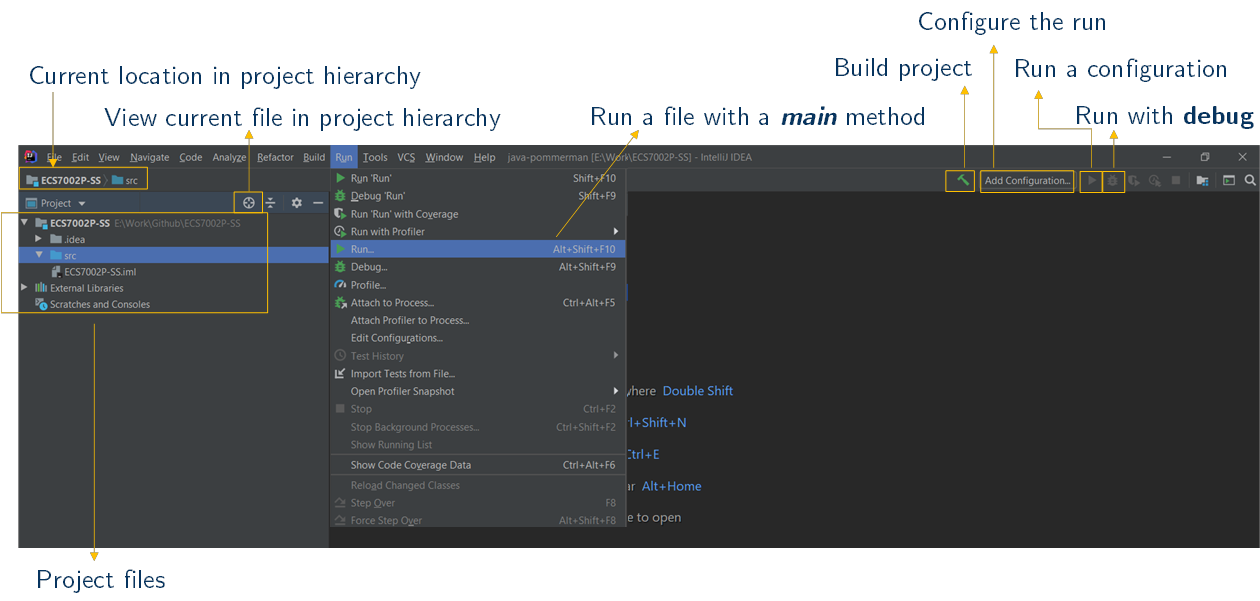
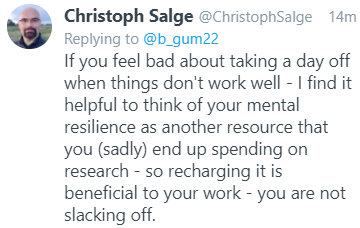
Your mental and physical health are important! Please remember to take care of yourself and to take breaks and time off when needed. Do contact your supervisor if you're experiencing any issues, and let them know if you do need time away - you don't need to give me a reason, but letting them know would avoid other issues.
Important note: you're not alone!
Some resources for you to check (good to go through even if you don't need them yet):
- Queen Mary's Advice and Counselling Service
Queen Mary has a variety of services and links for student wellbeing. - Bell House 'Coping With Anxiety' Sessions
This is a series of online meetings aimed at 18-25 year-olds, held weekly and hosted by assistant psychologists. - Mind - Student Mental Health Resources
Mind is the UK's mental health charity, and this page lists helpful links and resources, in conjunction with Student Minds. - NHS Student Mental Health
Links to mental health resources within the NHS, including helping with understanding issues, and support.
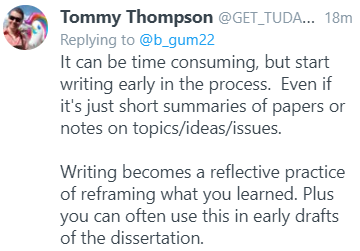
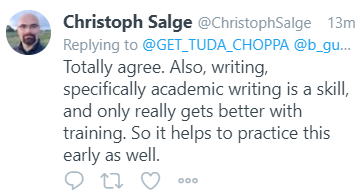
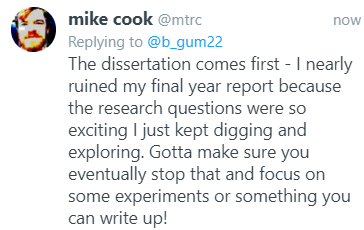
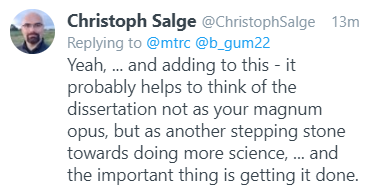
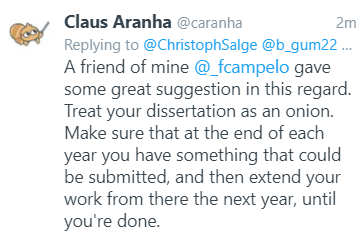
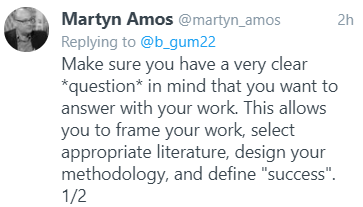
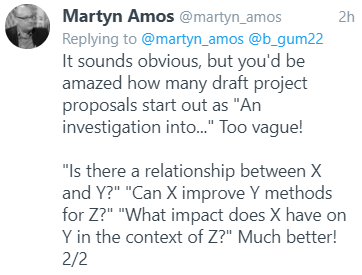
I've asked Twitter to share some of their tips and tricks for getting started with research projects. Here are some great answers they've given!
P.S.: Twitter is a great platform for finding out about new research, or for promoting your own work. Getting involved in the community early can be very advantageous, even if it's just to say hi, follow others in the domain you're interested in or post pictures or comments on your in-progress work!
Tweetdeck is a great tool for Twitter which helps organize your interests.